New Thing #325: Using A Die Cut Machine

Die_CutWhen I first started 365 New Things In 2013 I had a list of ideas of New Things I was intending to try but hadn't done yet and was kind of waiting for a challenge like this to make me finally just go and do them. Some of them - like trying stand-up - are not looking very likely to happen in the next 40 days. (Though hardly a day has gone by where I haven't thought about doing it, believe it or not.)

Others, well, I've done pretty well at making them happen.

Including today's. Although on my list it's not worded as "Use A Die Cut Machine".

Instead it reads, "Cut out word machine thing".

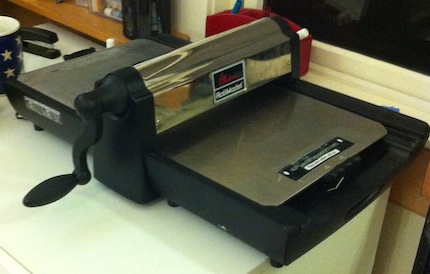
The 'cut out word machine thing' is indeed called a die cut. And, well, as far as modern-day machines go, it's a blast from the past.

The one we have at school runs by hand crank, and I've watched a bunch of people use it, but I never had myself. (For those not in the know, Letter_C
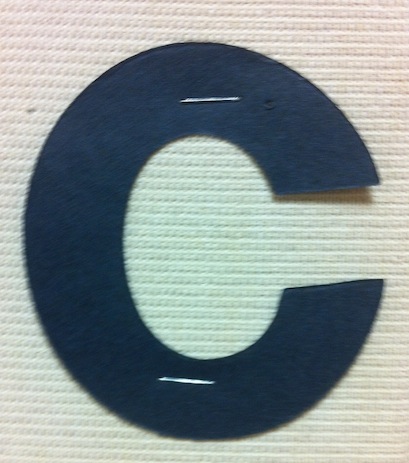
it's something where you put paper over a block stencil and it cuts out letters for you to put up on bulletin boards and such, rather than you having to cut out letters yourself. At right is an example. Don't feel bad if you've never heard of this: It's the type of thing that I only know exists because I'm a teacher.)

I came close to using it myself in September, but someone else was running their letters through the thing and they offered to take mine so I let them. I almost passed that off as a New Thing, but you know me - it didn't feel legit, so I waited until I did it myself.

That time came this week. Although, if we're being honest, I didn't 100% need to do it. I have some of the pre-cut letters that you buy at Staples that I could have used on my bulletin board. But I needed to try out the die cut machine, so I took my black construction paper and made my way to the faculty room.

I think you know this about me, but I'm not the most artsy-and-craftsy guy. I can take on something like a craft if I work myself up for it, but it's hard for me to initiate something like an art project.

Part of my reluctance is a fear I will mess something up and do irreversible damage. Like breaking a die cut machine.

Well, I didn't break it. I actually quickly became quite adept at it, re-using one piece of construction paper by running it through multiple times for a bunch of different letters.

I was kind of proud of myself for that - it seemed like a pretty pro die cut move on my part.

I've come a long way from a guy who just about a year ago was still calling it a 'cut out word machine thing.'

New Thing #304: A Jack-O-Lantern Design

Drawn_PumpkinFor a long time I've thought about doing something on a pumpkin besides the traditional scary or silly-looking jack-o-lantern. But I've always thought it was going to be just too hard.

This year, though, is all about jumping in and trying something that I always thought might be too hard.

So, I carved a pumpkin with a design on it.

Now, rest assured - I am not turning into a Red Sox fan.

I guess I just find the Red Sox and their logo and their ballpark aesthetically pleasing.

And I love my daughters. And they're very excited about Halloween. And carving pumpkins. And they like the idea of the Red Sox in the World Series.

So all of that adds up to a Red Sox pumpkin.

Let me take you through the steps picture by picture.

B_Stencil I've told you about my trouble settling on big decisions. Figuring out what to carve was one such decision. I toyed with the idea of something Mets-related, but the 'NY' looked too difficult. (Plus, what would I tell the neighbors. It would invite too many questions, not the least of which would be, "With the Red Sox in the World Series you carved a Mets pumpkin why...?") My original idea was the Boston 'B'. I found this stencil on-line at mlb.com and dove right in.

I was not at all pleased with my drawing. (You can see that picture at the top of the post.) I didn't like the proportions. But, as I joked on social media, I was either going to do a great jack-o-lantern or destroy a pumpkin. I figured it was reckoning time. And it looked like we were heading towards the 'destroy' option.

Carved_Pumpkin

(I should say here that my daughters and my wife cleaned out the pumpkins of the pulp and seeds. I have tactile issues and hate touching the inside of a pumpkin. My wife rather enjoys it.) I was going to have my wife do the carving, but she didn't think she could do the curves, so it was on me. I think I did a pretty good job, except, as you can see, that bottom piece didn't really have the proper support.

Propped_Toothpick

So I threw in a toothpick to prop it up. Success. Here's what it looks like all lit up:

Pumpkin_Lit

New Thing #256: Isabella Stewart Gardner Museum

GardnerHere's one of those New Things that makes the highlight reel for the year: On Thursday I went with my class to the Isabella Stewart Gardner Museum.

You might know about the Gardner as the art collection of an eccentric woman.

Maybe you know of it as the Museum of Fine Arts' often-overlooked little sister.

Most likely you've heard of it because of the 1990 art heist.

I knew of it, but had never been.

Now I can't wait to go back.

Here's the quick and dirty history: Isabella Stewart Gardner was an art collector, and she built this courtyard/outbuilding to house her collection. When she died, her will stipulated that the collection should remain as is. This is the early 1900s.

Fast forward to 1990, and a couple of thieves, disguised as police officers, duped the on-duty night guards into letting them in, tied up the guards, and proceeded to steal millions of dollars worth of art. (You may have heard this story on the "Boston" edition of Drunk History.) Some of the pieces of art were cut out of the frames because the thieves couldn't remove them from the wall. Remember the will stipulating that the collection should stay as is? Well, the frames stay on the wall empty because of that fact.

So we took a little hourlong tour on Thursday in small groups. My particular tour guide was great - she let the students talk about the art but kept us informed as we walked. She showed us some nice pieces, and told us about how Gardner would sit in the courtyard sipping champagne and eating donuts, admiring her art and courtyard.

It's a really amazing place, and the courtyard is just beautiful. It's one of those places where while I'm there the entire time I'm thinking, "I want to come back with my family." (Not unlike my thoughts when I was in Quebec.) Unfortunately, there are no photos allowed inside (and I'm a rule follower), so I can't show you what I liked so much.

There's something about the fact that everything is left as the owner intended - I like the idea that when I go back everything will be exactly where I saw it this time. That same fact makes it somewhat chilling to see the empty frames on the wall. I saw two big empty ones in the "Dutch Room." It's weird to think that thieves did their work in that exact spot.

I've said before (I think when I visited the Met) - I'm not the biggest art fan in the world. I'm not sure I know how to appreciate art the way it was intended. But I'm becoming better able to appreciate art museums.

And the Isabella Stewart Gardner Museum is already one of my favorites.

New Thing #129: Working With Copper

Copper_MuseumI could probably stretch out my time in Quebec into a hundred New Things. (And come number 250 or so I might regret not having done that.)

But I think the last thing I'll write about from my time there is the fact that we visited a copper museum.

That's what you see here.

But visiting the museum by itself, while new, wasn't the highlight of that part of the trip.

That would be the fact that while we were there we all had the chance to do our own work with copper.

The name of the place was Cuivres d'art. I think, as the subtitle indicates in the above picture, that means copper art. But I want it to be, like, Museum of Copper Art.

Except, I suppose, it wasn't really a museum.

There is a display about the availability of copper in parts of Canada and the United States.

And there's a big exhibit in the back featuring incredibly detailed copper images of the life of Jesus. Religious or not - they were pretty impressive.

But the central spot is a display area, featuring copper you can buy as well as the spot where our activity was done, where we all made an image in copper.

I wanted to do something appropriate to our trip, so I decided on the maple leaf. That was a clutch decision I'm proud of, because it perfectly captured the trip, and usually I have trouble with those types of decisions.

I don't remember all of the steps exactly at this point, since I'm so far removed from it, but the first step was to trace (or create, as I did) your image onto the blank copper piece with a sharp tool, and then you had to just trace the inside of the image - kind of to give it depth.

Then you took a little rounded tool and traced around the outside portion, which made your image pop out a little more. Then there was one more step, which I don't remember. It might have been flattening somewhere else.

But it was a cool experience - definitely something I've never done before. (Though close to what I've seen some of my students do in their art class using clay, I think, as a medium.) Here's what the process looked like, kind of step-by-step:

Copper